Search This Blog

Saturday, April 30, 2016

April Showers bring May Flowers

Card

April Showers Bring May Flowers


April Showers bring May flowers, never really gave that saying much thought. As I was making this card I thought about that saying a lot. What does that mean? Why would people think to say that? Well it's simple it rains and flowers bloom. I love flowers, I have a rose garden in my yard that lines my grass. They are blooming right now and are so beautiful. At the beginning of the month my cherry and plum tree had there pretty blossoms on them. The trees now have fruit growing. So now when April comes next year I will appreciate the saying much more. 


This is the supplies you will need to make this card
1. Stamp (Stamps of life) and some I had  2. Dies (Stamps of life)
3. Ink Thistle, Lagoon, Black (Close to my heart)
4. Scissors  5. Glue (Tombow Mono) 
6. Paper color choice  7. 3D Foam squares
8. Paper cutter  


You will first pick out your papers. Then die cut you umbrella, boots, and anything else you need. I cut out several colors as I was not sure what color I was going to use.


Next you will cut your paper for the layering. Cut your first piece 1/4 inch smaller then the card base, then the next layer 1/4 inch smaller. then stamp your dies cuts and the top layer paper. Making a puddle, and rain drops. Then stamp your sentiment and cut into a cloud shape. Put the 3D foam squares on the back of your images. 

You then add the cloud stickers and put all the dies where you would like them and glue them down. With the boot I put one directly on the paper and the one in front, I used the 3D squares on it. I did that so it looks like it is closer. This was a fun and easy card to make. Thank you for stopping by and checking out my blog.


Thursday, April 14, 2016

Gift Tag For Baby Boy

Gift Tag For Baby Boy

Tag


I love making tags, they are fun to make, and pretty easy. This tag I made for someone who had a baby boy. I needed a gift tag for the gift and thought of the Julie Nutting stamps I have. Usually I will cut cardstock paper for my tag. This time I had the chipboard tag I got from Infinity Engraving, and wanted to us that for my tag. You can also get the stamps from Infinity Engraving to.


This is a list of what you will need to make this project.

1. Scissors  2. Ink  3. Block for Stamp
4. Baby Stamp ( Julie Nutting ) from Infinity Engraving
 5. Boy set stamp ( Julie Nutting ) from Infinity Engraving
6. Chipboard Tag from Infinity Engraving 
7. Mod Podge  8. Paint brush 9. Multi liquid glue
10. Different kinds of ribbon  11. washi tape
12. several pieces of paper 13. Stamps from Close to my heart


I started by putting Modge Podge on the chipboard to glue down my paper. Placed the paper over the chipboard and pushed out all the bubbles. Let the paper dry for about 1/2 hr. and timed the edges.  


 I then stamped the images of the baby and the clothes for the baby on the papers I chose. I then fuussy cut them out and glued them together. 


I then stamped the wording at the top of the tag, added the washi tape. 


I glued the baby and added the lace to the bottom over the washi tape. I did a piece of twin at the top of the lace also. Put some sequins to add a little bling. The last thing I did was cut two kinds a ribbon and twin for the top of the tag. This was a easy and fun project to make. The mom to be now has a gift tag that is a keepsake also. You can get the stamps and the chipboard tag at Infinity Engraving, so you can make your own gift tag. Thank you for stopping to read this blog.

Tuesday, April 12, 2016

Mix Media Love Canvas

Mix Media Love Canvas

Get out of the Kitchen and back to Crafting


This blog was about Getting out of the kitchen and back to crafting...... Hum........ I love to cook but love crafting so it was not hard to do this. I was looking at the this new stencil I got, and the bird chip boards, and really wanted to use them in my project.  It had to be some type of a mix media project. So I started by gathering all my materials I wanted to put into it. I love purple so I knew that was another thing I wanted to have in my project. 


Here is a list of what you will need to complete the project...

1. Bird Chip boards from Infinity Engraving
2. Stencil from Infinity Engraving ( Love )
3. Stencil from Tim Holtz ( Burlap ) 
3. Heat gun ( If you want the layers to dry fast so you can finish this in a day )
4. Paint brush  5. Piece of cardstock paper for spreading the gesso, paint, past. 
5. E600 (Clear)  6. Brown and Green acrylic paint 
7. CM metallic past (Gold) 8. Gesso ( Bob Ross)
9. Art Screen Ink Raspberry  10. ink spray Green, Yellow, and Blue (Ranger)
11. Glimmer Mist Olive, Daisy, Coffee, Walnut Gold. and Clear Coat 
12. StazOn ink 13. Big flower stamp 13. punched butterflies 
14. Metal mix media stuff  15. Tulle 16. Canvas 17.Flowers


I start by applying gesso on the chipboard birds with a paint brush. I then apply a thick coat of gesso in the canvas using a piece if scrap cardstock paper. Moving it around and leaving it an even layer on the canvas. when your done you have a choice, you can let it sit over night to dry, or you can use the heat gun to dry it faster. Well I could not wait so I used the heat gun and was ready for to go to the next set in 15 minutes.


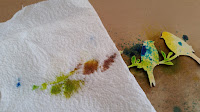
I Started with the chipboard birds, used the spray inks, just sprayed a little of each color tell I got the look I wanted. Then took a paper towel and blotted the ink off. I knew that because of the chipboard the ink would soak into it. So I would get a subtle color on the birds. I then took the green and brown acrylic paint and painted the branch and leafs. 


I sprayed the canvas with the spray inks and the glimmer mist. I used all the colors I listed. I then used the heat gun to dry it. The color as you can see lightened us a lot do to the glimmer mist I put on the canvas. But as you will see in the later pictures, as it sat longer it went back to the darker look. 


When you use the Cm and the art screen ink it is very thick and acts as a glue for you. So I then took the tulle and spread the CM on it and used it as a glue to apply it to the canvas down towards the bottom half of the canvas. I then used the Burlap stencil and the art screen ink and applied it to the top corner using the cardstock scrap paper. I then used the art screen ink to apply the mixed media metal stuff to the canvas in two places. 


I took my flower stamp and used the StazOn ink and stamped the canvas in several places. Then used the Love Stencil from Infinity Engraving and the brown Acrylic paint to put the love on the canvas. 


I then used the E600 to glue the butterflies, birds, and flower down to finish this project. I really love how it came out. So much fun to make, and now to enjoy. You can get most of the things to make this at any craft store. But the chipboard you need to head over to the Infinity Engraving web. sight or to their Etsy store. All you need to do is google it. 
Thank you so much for ready my post, go and try this, it is fun not not hard at all to make.

Allie Clark