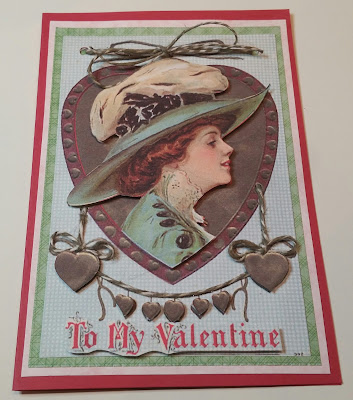
VALENTINE DAY CARD
Project using printable image
I used the free image for the month for this project, I printed out two of the images. When I saw the image I was so excited to make a card with it. One of the things my husband loves when I make cards for him. He likes how I give most of my cards a 3D look to them. I did some fussy cutting and 3D foam squares to make it not lay flat.
The supplies you will need ....
1, Print out the image
2. Card base I used red,
3. Three layers of different colored (design paper to layer)
4. Scissors small sharp
5. Glue ( I like Tombo glue the best)
6. 3D Foam squares
7. Ink for the edges
8. Twine
9. Hole punch
I first fussy cut out the image. Turn over the pieces and put the 3D Foam squares on the back. Make sure you put enough on them so they lay down without a bow in the middle. Make sure to put thin in the middle of the image.
With you second image, punch the hole in the image where the twin will go through to the back. Bring the twin in from the back to make a bow for the top just like it is printed on the image. Do the same for the two other bows. Put twin wherever you see that the twin needs to go. Then place the cut out images with the foam dots on them over the image. You will then have a 3D image.
Cut all your layering pieces of paper. Cut each layer about 1/4 " smaller then the one under it so you get a nice even look. Glue down each layer. You are done. I went to Infinity Engraving to get my images. Love Love the images that they give to everyone to use.


